03 April 2016

Part 3 Molding and Casting - Reflection

When I began to research and gather together the materials for Part three I thought I was going to struggle.  However, as I researched the properties and health and safety of the different materials that could be used in Part three I began to think of it in a different light.  Doing the research into each of the materials helped me enormously with the decision about which I should choose.  It definitely helped me decide that I did not want to play around with anything that had huge health and safety issues with it.  I thought about this and wondered if I was being too blinkered in my choices but realised that this is who I am so chose materials I felt comfortable with.

When I researched artists for this assignment I was unsure as to what I would feel about the work because it didn't quite fit into textiles for me.  However, I really enjoyed looking at the work of Eduardo Paolozzi and feel it inspired my casting samples.  I am beginning to look further afield for artists work that could have an interest for me and am finding I am not so initially dismissive of something.  I am beginning to look closer and ask more questions as the course goes on.  It is not quite second nature but I feel I am beginning to get there.

I feel that I have been quite free with my sample making.  I have found that I can go further with some sampling and am learning not to worry if something does not work.  I don't feel as concerned now as to whether I am doing something right or wrong.  I think I am more open to working on something that takes me in a different direction where before this would concern me because it wasn't true to the original idea.

I really like working with fabric and thread but working with the different materials in this part of the course has been very interesting for me because I can see that I could incorporate different materials together using stitch even though it may not be in the traditional sense.  I particularly like the contrast of the plastics and clay against the thread.  

Overall I have found this assignment to be very interesting and has helped me to widen my interest into other aspects of art and textiles.  I think I have also got over my slight hesitation to play around with materials and techniques more and not to worry about whether the outcomes are right or wrong or true to the original idea.  I realise nothing is wasted.

Points I think I need to work on:


  • Drawing more of my samples.  Using my sketchbook to make notes and drawings of ideas.  This is an ongoing battle I have with myself and my sketchbook as to what I am to put in it.
  • Continue to develop my feeling of being playful with sampling and take techniques a step further even if it takes me away from the original.
  • Research more widely.  I am using the internet/Pinterest/books.  I think I need to visit more museums and galleries.  
  • I find it difficult to compare my work with artist's work.  I need to develop my writing about their work more and question more why I do or don't like a piece of work.  Not to worry as to whether my opinion is right or wrong.

Part 3 Molding and Casting - Stage 1 Research

After looking at the information about the different casting materials I have decided to work with some of the following:

Clay - I have bought a white air drying clay.  This clay is a moist oil based and non-toxic.  Once dry it cannot be reused but if kept in a sealed container or zip-lock bag it will stay soft.  The only safety information I can find on the product is that it can be a choking hazard because it can be made into small parts.

Papier-mache - this can be made by using strips of paper (usually newsprint) or using a paper pulp.  The glues used to bind these could be flour and water glue, wallpaper paste glue or white PVA glue. Release agents can be vaseline, cooking oil, washing up liquid or using cling film between the chosen object (such as a balloon) and the papier mache.  When in contact with water the material slowly hardens and then becomes hot. (Gloves)

Plaster - casting plaster is manufactured and sold under a number of different names.  The most common name being Plaster of Paris.  Other names include art plaster and gypsum plaster. 

Different grades are used for different purposes these need a different ration of water to plaster and have different drying times.

As I was searching for health and safety advice it became apparent that care should be taken when using the plaster.  I found advice on the NSEAD (National Society for Education in Art and Design.  Direct, prolonged and repeated contact can cause irritation to the skin.  Avoid contact with the eyes.  The dust needs to be controlled as it can cause irritation and breathing difficulties.  As the material becomes hot if guidelines are not followed burns can occur.  There are guidelines on the use of Plaster of Paris on the NSEAD website.  (Gloves, safety glasses and well ventilated space).

Liquid Latex - is quick drying and forms a durable elastic rubber skin.  It is used in a variety of manufacturing and hobbies for example TV and film industry, balloons and plaster casting industry.  It is non-toxic and safe to use in the home as long as the recommended precautions are followed.  It does contain low levels of ammonia high levels of which can be an irritant and cause corrosion.  The ammonia acts as a preservative and the latex can be kept for about 12 months if stored in the correct conditions (dark and cool). (Gloves, safety glasses and well ventilated space).

Instamorph - this is a lightweight thermoplastic.  When it is warm it acts like clay but when cooled is a strong plastic.  It is non-toxic although it has not yet been certified as safe for internal use or food contact safe.  When it is hot it can stick to other surfaces so care should be taken.

With all of the above even when experimenting it is necessary to follow the manufacturers instructions and guidelines for the safe use of the product.

Eco-Resin - eco-resins are polymer resins that are non-toxic, renewable and water based.  Natural plants, vegetable extracts and renewable sources are the basis for bio-resins. Bi-resin's main ingredients are sunflower seeds and soya bean proteins.  It is a crystal clear resin.  Most have no toxic vapours and can be used safely in any working environment.  Bio-resin can be made from plants that grow in poor dry soil.  This can therefore be a valuable crop for farmers and businesses in developing countries so helping to reduce poverty.


Eduardo Paolozzi

Eduardo Paolozzi was born in 1924 of Italian parents.  He attended Edinburgh College of Art in 1943.  He attended St Martin's School of art from 1945 ro 1947 and studied sculpture at the Slade School of Fine Art.  He taught at the Central School of Art and Design from 1949 to 1955.  

He made sculptures inspired by Surrealism and made a number of collages.  He had an interest in images of modern machinery.  Large Frog 1957 was made from old plastic toys, electronic equipment and bits of machinery all things that were waste.  These were pressed into clay and then cast into sheets of wax which were cut and bent and assembled into the final piece.

In the 1950's he also concentrated on the human form.  He incorporated impressions from machine and metal parts into wax maquettes which were then cast in bronze.

During the 1960's he collaborated with industrial engineering forms eventually using aluminium in his work.

In the 1970's Eduardo Paolozzi experimented with wood in relief works using intricate networks of geometric and biomorphic elements.

In the 1980's in his private work mutilated heads appeared as if badly pieced together in sections.  He used the head as a subject in collages and sculpture work.  His best known works are his work for public places including the coloured mosaics design of the Tottenam Court Road tube station and the cast iron sculpture Piscator in Euston Square, London. 

Whilst doing this research I had to travel to London and on arrival at Euston Station the first thing I did was to head out to Euston Square and look at the cast iron sculpture Piscator.  I took photographs which are below.  If I had not been introduced to Eduardo Piolozzi's work through this course I would not have looked so closely at the sculpture and would have probably only given it a cursory glance. I was excited to be able to be up close so that I could touch it and see all the marks and nooks and crannies on the surfaces. To see something up close that I had been reading about actually gave me a feeling of happiness and realised that what I would have dismissed from photographs in books is actually a very interesting tactile piece of work.

I would like to see more of Eduardo Piolozzi's work.  I particularly like Plaster Relief.  I like this because it is simple and uncluttered.  I like that the edges are uneven and I think it gives the piece a naive look and almost like a sample.  I would like to try to take something like this into my work for this assignment.  I have decided to use plaster for some of my sampling and this has given me ideas for casting objects from nature. 

Sir Eduardo Paolozzi ‘Plaster Relief’, 1948
© The Eduardo Paolozzi Foundation
Plaster Relief - Eduardo Piolozzi 1948 Plaster and shellac


Piscator sculpture Euston Square London

Eduardo Paolozzi - Large Frog 1958


Victoria Ferrand Scott

Victoria Ferrand Scott has been a member of the Yorkshire Sculptors Group since 2009.  Her work was selected for exhibition at the Royal Academy in 2008 and 2012.  She was awarded Associate Membership of the Royal British Society of Sculptors in 2009.

She uses fluid materials in her work. In 2010-2011 she did a Leverhulme funded artist residency in Civil Engineering at Leeds University where she experimented using flexible forming for casting concrete using latex and fabric moulds.

Victoria Ferrand Scott uses drawing and photography as an essential part of her work.  She looks for sculptural characteristics in everyday situations  She uses video work to document social interactions in public spaces and explore the differences between her experience of these and the video camera recordings.


'Concretions' - cast concrete


'Concrete Army' - cast concrete test pieces


Rachel Whiteread


Rachel Whiteread House
House - Rachel Whiteread 1993

Rachel Whiteread studied painting at Brighton Polytechnic and scuplpture at the Slade School of Fine Art.  Included in some of her significant work is a work in 1990 named Ghost which is a plaster cast of a living room based on a typical Victorian terrace house.

She created a monument for the empty plinth in Trafalgar Square in 2001.  She was awarded the Turner Prize in 1993 just after creating a life sized replica of the interior of a condemned terraced house in London's East End.  This was called House and was made by spraying liquid concrete into the building's empty shell.  The external walls were then removed.  It was destroyed in 1994.  It drew mixed responses.

Her work just makes me wonder at the size of it.  I just feel amazement at the internal casting of a house.  When I look at the pictures of it it makes me feel quite sad.  First because it looks lonely and empty and makes me think the people who lived there may have felt lonely and empty but it also makes me feel a little sad that it was destroyed a year after she had made it.


References

YouTube, (2016). Using Das clay. [online] Available at: https://www.youtube.com/watch?v=IwULG2OUK2M [Accessed 8 Feb. 2016].

YouTube, (2016). DAS Modelling Clay NEW PART 1. [online] Available at: https://www.youtube.com/watch?v=VTO-6jfjMcY [Accessed 8 Feb. 2016].

Nsead.org, (2016). NSEAD - A Guide to Safe Practice in Art & Design (Chapter 7: Materials). [online] Available at: http://www.nsead.org/hsg/hs712.aspx [Accessed 8 Feb. 2016].

Liquidlatex.direct, (2016). Liquid Latex Direct. [online] Available at: https://www.liquidlatex.direct/ [Accessed 8 Feb. 2016].

Account, M., Gadgets, E., Garden, H., Props, C., Crafts, A., Parts, R. and Ergonomics, O. (2014). InstaMorph – Moldable Plastic. [online] InstaMorph. Available at: https://www.instamorph.com/ [Accessed 8 Feb. 2016].

Account, M., Gadgets, E., Garden, H., Props, C., Crafts, A., Parts, R. and Ergonomics, O. (2014). InstaMorph – Moldable Plastic. [online] InstaMorph. Available at: https://www.instamorph.com/ [Accessed 8 Feb. 2016].

Castingabout.co.uk, (2016). Eco-Resins. [online] Available at: http://www.castingabout.co.uk/Eco-Resins.html [Accessed 9 Feb. 2016].

Tate, (2016). Sir Eduardo Paolozzi, 'Dr Pepper' 1948. [online] Available at: http://www.tate.org.uk/art/artists/sir-eduardo-paolozzi-1738 [Accessed 11 Feb. 2016].

Eduardo Paolozzi - Large Frog 1958. (2016). [image] Available at: http://www.mylearning.org/art-across-the-curriculum/p-638/ [Accessed 15 Feb. 2016].

Yorkshire Sculptors Group| contemporary sculpture| UK, (2016). Yorkshire Sculptors Group| contemporary sculpture| UK. [online] Available at: http://www.yorkshiresculptorsgroup.org/#!victoria-ferrand-scott/c9rq [Accessed 22 Feb. 2016].

Concretions Victoria Ferrand Scott. (2016). [image] Available at: https://static.wixstatic.com/media/4d4e35_9462d6b9cd564cb188829783ab1a30ca.jpg/v1/fill/w_325,h_433,al_c,q_90,usm_0.66_1.00_0.01/4d4e35_9462d6b9cd564cb188829783ab1a30ca.jpg [Accessed 22 Feb. 2016].

Concrete Army Victoria Ferrand Scott. (2016). [image] Available at: https://static.wixstatic.com/media/4d4e35_93d079e322e949e995186eb7aa28afe1.jpg/v1/fill/w_325,h_433,al_c,q_90,usm_0.66_1.00_0.01/4d4e35_93d079e322e949e995186eb7aa28afe1.jpg [Accessed 22 Feb. 2016].

Anon, (2016). [online] Available at: http://www.tate.org.uk/whats-on/tate-modern/exhibition/unilever-series-rachel-whiteread-embankment/rachel-whiteread-0 [Accessed 22 Feb. 2016].

Anon, (2016). [image] Available at: http://images.tate.org.uk/sites/default/files/images/house_whiteread.jpg [Accessed 22 Feb. 2016].

Part three Molding and Casting Stage 4 Sorting


I like the two thermoplastic samples above because of the way the pattern from the food containers that the plastic was cast in have come out so clearly and that the plastic has taken being coloured with paints well.


I think this is a successful sample because the strong colours and softness of the crochet stand out against the white hard plastic.  The crochet gives the hard plastic pieces movement.  


I like this sample because I have been able to use thread in it and I particularly like the movement because of the way I have left a gap between the clay pieces when sewing them together.


In this sample the thick soft contrast of the scrim against the thin hard clay has made the clay pieces stronger and I find this interesting because the clay has been rolled so thin it is very delicate.  


This sample is a favourite because I like the fact I have been able to stitch into the hard clay but keeping a delicate look with the stitching even though the holes are quite large in comparison to the thickness of the thread.  Thinking about this now I can see that I could work into the overlapping edges to give them some interest for example perhaps cutting pieces out of the edge.  However, I do like the quite simple look of this piece although it has quite a lot going on - the overlapping of hard materials, joined together by sewing with fine thread.


This sample interested me because I could manipulate the air dry clay almost like a piece of fabric.  I think it has given an interesting surface as it has dried.  The folds are tactile and as it has dried cracks have appeared in the clay that look almost like fabric creases.  I like the way the clay is very pliable and I can manipulate it to attain the folds.

Part 3 Molding and Casting Project 2 Casting the internal space of a vessel Stage 3 Recording outcomes

I approached this project with quite a bit of trepidation.  I looked into the health and safety of the materials that could be used and after a great deal of thought I decided to use plaster of paris.

I decided first to lay a freezer bag that I had put kitchen utensils in and lay it into a plastic food container.  I then poured the plaster over this hoping to get some good casts of the utensils within the shape of the container.  This was not very successful although the surface is quite interesting.

I then poured plaster into freezer bags and tied them with different thicknesses of thread in a variety of ways.  Very unsuccessful.  I have ended up with clumps of plaster that have some lines in from where the thread was.  I am actually not sure what I was expecting but I am disappointed with the outcome.  I had placed the bags onto objects - dried orange slices and plastic vessels but nothing significant came from this.  

I did found it a difficult project and although I do understand that it can be good to go out of one's comfort zone so that development can occur I did not feel at all comfortable working with the plaster and do not think that I would be able to develop further with it.  I do not like the feel of the pieces as they are very cold in comparison to the air dry clay I was using in the first project and I do not like the fact that I cannot control the plaster as I could to a certain degree with for example the clay.  I know I am a person that has to have some control over what I am working with although I understand it is the happy accidents that can give most excitement to a piece but feel that I can still achieve this.  Funnily I feel more relaxed and able to play about with materials when I have a certain amount of control and perhaps this is why I did not like working with the plaster. 


Part 3 Molding and Casting Project 1 Molding from a surface Stage 3 Recording outcomes


I decided to use air dry clay, ThermoMorph moldable plastic and clear resin for this project.


I began with the air dry clay.  I gathered together objects from around the house and pine cone, leaf, seedhead, dried orange slice and and avocado stone.  I also used plastic containers that food had been stored in.


This piece was cast into a food container that had held dates.  The piece on the right is the reverse of the cast.  I like the fact that both sides are very clear casts.  The air dry clay was very easy to use.  I rolled a piece out first before pressing it into the container.  


I used an implement that is usually for mashing eggs.  The 'feet' of the object were pressed into air dry clay.  I like the impression that was made and felt very satisfied with the clear image and think that this would make a good repetitive pattern.


These impressions were made by using the edge of a dried slice of orange.  I think this makes an interesting surface because it looks tactile and that there is a pattern but it is freely done.


Next I pressed a cord taken from a gift bag into the clay.  This is the reverse side showing the lumps and bumps of the cord.  The isolated impressions were made by pushing the knot that was at the end of the cord into the clay.  Again I thought this was successful and I like the relief impressions that were made.  I think this invites someone to want to handle it.


I pressed the side of a seed head into the clay.  This gave the clay a textured look almost as if it had been weathered.  I quite like the look of this because it is in contrast with the previous pieces which were more set and patterned.  I do like texture because it makes me want to look further and touch it.


The three photographs above show impressions of seedheads that have been pressed into the clay in set patterns.  These pieces combine texture and pattern.  I prefer the third piece because it is not as fussy as the previous two.  I am enjoying working with air clay very much because of its flexibility and the results I am getting.


I pressed end of a kitchen implement into the clay and this made what I think are very nice and interesting marks. I like this because I think the edge could be pressed into the clay in quite a variety of ways for example close together, wide apart or at an angle to give a different look and texture.


I pressed the whole of the top of the same implement into the clay and again this gave a very clear cast and a different look to using the edge.  Also this is the front of the cast.


This is one of my favourite casting pieces.  It is the top of a poppy seedhead pressed into the clay.  I like it because the cast is very clear and it looks delicate at the same time.  A variety of patterns could be built up using the seedhead.


Above I rolled out two pieces of the clay and rolled a pine cone over it.  I was thrilled at the texture and pattern that this caused.  It actually reminds me of reptilian skin.  I added some gold leaf flakes to one of the pieces.  I think this looks slightly random and I do not like it because of this.


I rolled the clay over a piece of lace.  I like the delicate casting of this piece but again it was a mistake to put the flakes into it because they look isolated and do not add anything to the piece.


The side of a toothbrush was pressed into the clay.  Although not my intention, amazingly it looks like a sand dollar.  


Having looked at Edardo Paolozzi's work I decided to do a piece that combined a few of the items I had previously used to cast into one piece of clay.  I do like the look of this because there is pattern, delicate and strong casts which seem to compliment each other.


Next I started to work with ThermoMorph moldable plastic beads.  This was obviously very different to working with the air dry clay.  The beads were put into hot water where they melted and formed a clear workable plastic.  When cooled slightly it was then able to be handled and had to be worked with straightaway as it set very quickly.  The beauty of working with the beads is that the set piece can be put back into hot water and it will melt and be able to be used again.

First I cast the plastic into food containers.  I was pleased with the results as the patterns on the containers were replicated very clearly into the plastic.  However, I do not like the fact that when the plastic is dried it turns white.  I was disappointed as I thought it would stay clear as when the beads are first melted.  Therefore, I decided to try and colour one of the pieces.  I used acrylic paint which I think was not very successful.  The plastic took the paint but was very patchy.  Although I do not particularly like this I prefer it to the stark whiteness of the set plastic.  I think this is because the paint highlights some of the indents and edges of the pattern making what I think is something more interesting to look at.


I tried moulding the plastic around a small container.  It held the shape very quickly.  Whilst the plastic was still soft I punched holes into the rough edges using the handle of a paintbrush.  Because of the quick setting time as I was doing this is became more difficult to punch the holes.  I then decided to add interest to the edges by tying pieces of scrim through some of the holes.  Not the most successful of pieces but I can see that the plastic beads could be used to make 3D items.


I went back to painting the pieces I had cast in the food containers.  I added more paint to the top piece and kept rubbing it back then adding more paint rubbing back again.  I think this has tidied the piece up more and I like it because of the definition where the paint is darker in the recesses highlighting the pattern which can be seen more clearly.  

The second piece was painted with metallic acrylic paint and this seemed to cover the plastic better.  I did have to apply a couple of coats with drying inbetween.  The paint again highlights the cast of the pattern more and again I like this because it makes me want to handle the pieces.

I printed and took rubbings using the cast pieces.  These I put in my sketchbook.


I tried moulding the plastic around a vessel again.  This time I used one of the small plastic bowls used to put washing liquid into a washer.  I folded the excess plastic over the edge and and then whilst still soft and having to work quickly I cut into the edge hoping to give more interest.  It has turned out flower like which I do not like the look of.  It just looks like a plastic flower.  However, I did enjoy using the plastic beads.  One point to mention is that I did not have to grease the molds before putting the plastic into or around the vessels as it can be removed very easily during drying and once set.


Next I worked with clear crystal resin.  I had been looking forward to working with the resin.  I began by using the recommended demolding vaseline to grease a food container that had nice round separate recesses.  I had decided to cast small found objects into each recess.  I put found objects such as buttons, seedheads, beads and lichen into each section and poured in the resin.  I had to leave this to dry for over two days.  I was disappointed in that I cannot however much I try get the resin piece out of the mold.  Therefore I have had to leave it as a whole piece including the mold.  I do like the effect of the magnification that the resin gives each piece.  

It was also interesting that the lichen changed colour.  Also the piece of linen with a few embroidery stitches on it had darkened so much and the colour had been taken out of the embroidery thread that the stitching cannot be seen clearly now.  I am assuming that some chemical in the resin reacted with these items making them change colour.  


Handmade felted button


Lichen


Handmade paper bead


Piece of embroidery on linen


Button


Gold leaf flakes and seedhead


Bead


Dried rosebud


Piece of lace


Seedhead


Beads


Handmade fabric covered button


The more successful piece using resin was one where I poured the resin into a food container that had a a pattern of deep indentations in it and then added found items to the resin finally pouring on another layer of resin.  The items were a dried leaf, a key that had beads and wire added to it and a feather.  The key and feather came out very well but the leaf kept rising to the surface and when pushed back down began to break as it became more brittle.  I had used the recommended vaseline release for the mold and this time it worked.  When the piece was dry which took more than two days it came away easily.  The downside is that however much I have tried to clean the piece it still remains sticky to the touch.  I have had to put it into a plastic bag for storage as it was sticking to surfaces.

I found the resin to be difficult to use because it was difficult to remove from the first mold and then the issue with the remaining stickiness once it was dry.  I have re-read the instructions and I did everything to the letter including using the correct measurements so I am not sure what went wrong.  I have another issue with using the resin and that is the unpleasant chemical like smell that it gives.  I worked in a well ventilated space but still the smell hung around and stayed for over a day.  I am quite nervous about using anything that can affect one's health and still did not feel reassured after reading that the resin was safe to use.  As a consequence I do not think I intend to experiment further with this.


I looked back at the work I had done in Parts One and Two and had liked the folding exercises and the edge work exercises.  I decided to see how the air dry clay and the thermoplastic would respond to being folded and pleated.  It was quite easy to manipulate the thermoplastic to pleat it although it would not allow me to get crisp edges along the folds. 

The air dry clay allowed me to get thinner edges but again not very crisp looking ones.  I think this does not matter because it was the folded effect I was looking for rather than neat edges and I like the way the clay looks like a piece of fabric that has been folded.  As the clay dried it began to get very fine cracks in it and this reminds me of creases in fabric.  I liked handling the clay better because it is easier to manipulate.


As I had enjoyed doing the edge work in Part Two particularly joining edges with different materials I decided to first put holes into two pieces of thermoplastic as it was drying.  I then joined the two edges by threading a piece of crochet through the holes.  I think this is quite effective because the strong colours and softness of the crochet stand out against the white hard plastic.  The crochet gives the hard plastic pieces movement.  I think maybe this could be developed into a 3D piece. 


I then cut out some curved shapes of air dry clay and punched holes into the pieces using a kebab stick.  When the shapes were dry I reassembled them by sewing thread through the holes but leaving spaces between the pieces so that as a whole it had more movement.  Unfortunately a piece snapped.  I had rolled the clay quite thinly and the thickness of the rolling is something that would have to be taken into consideration when doing this in future.  A lot would obviously be dependent on the size of the whole piece.


I joined two pieces of clay that I had cast seed heads into.  To join them I pushed dried lavender sticks through the clay whilst it was still pliable.  I think this has worked well and I like the effect of the rounded dried thin sticks against the smooth flat pieces of clay.


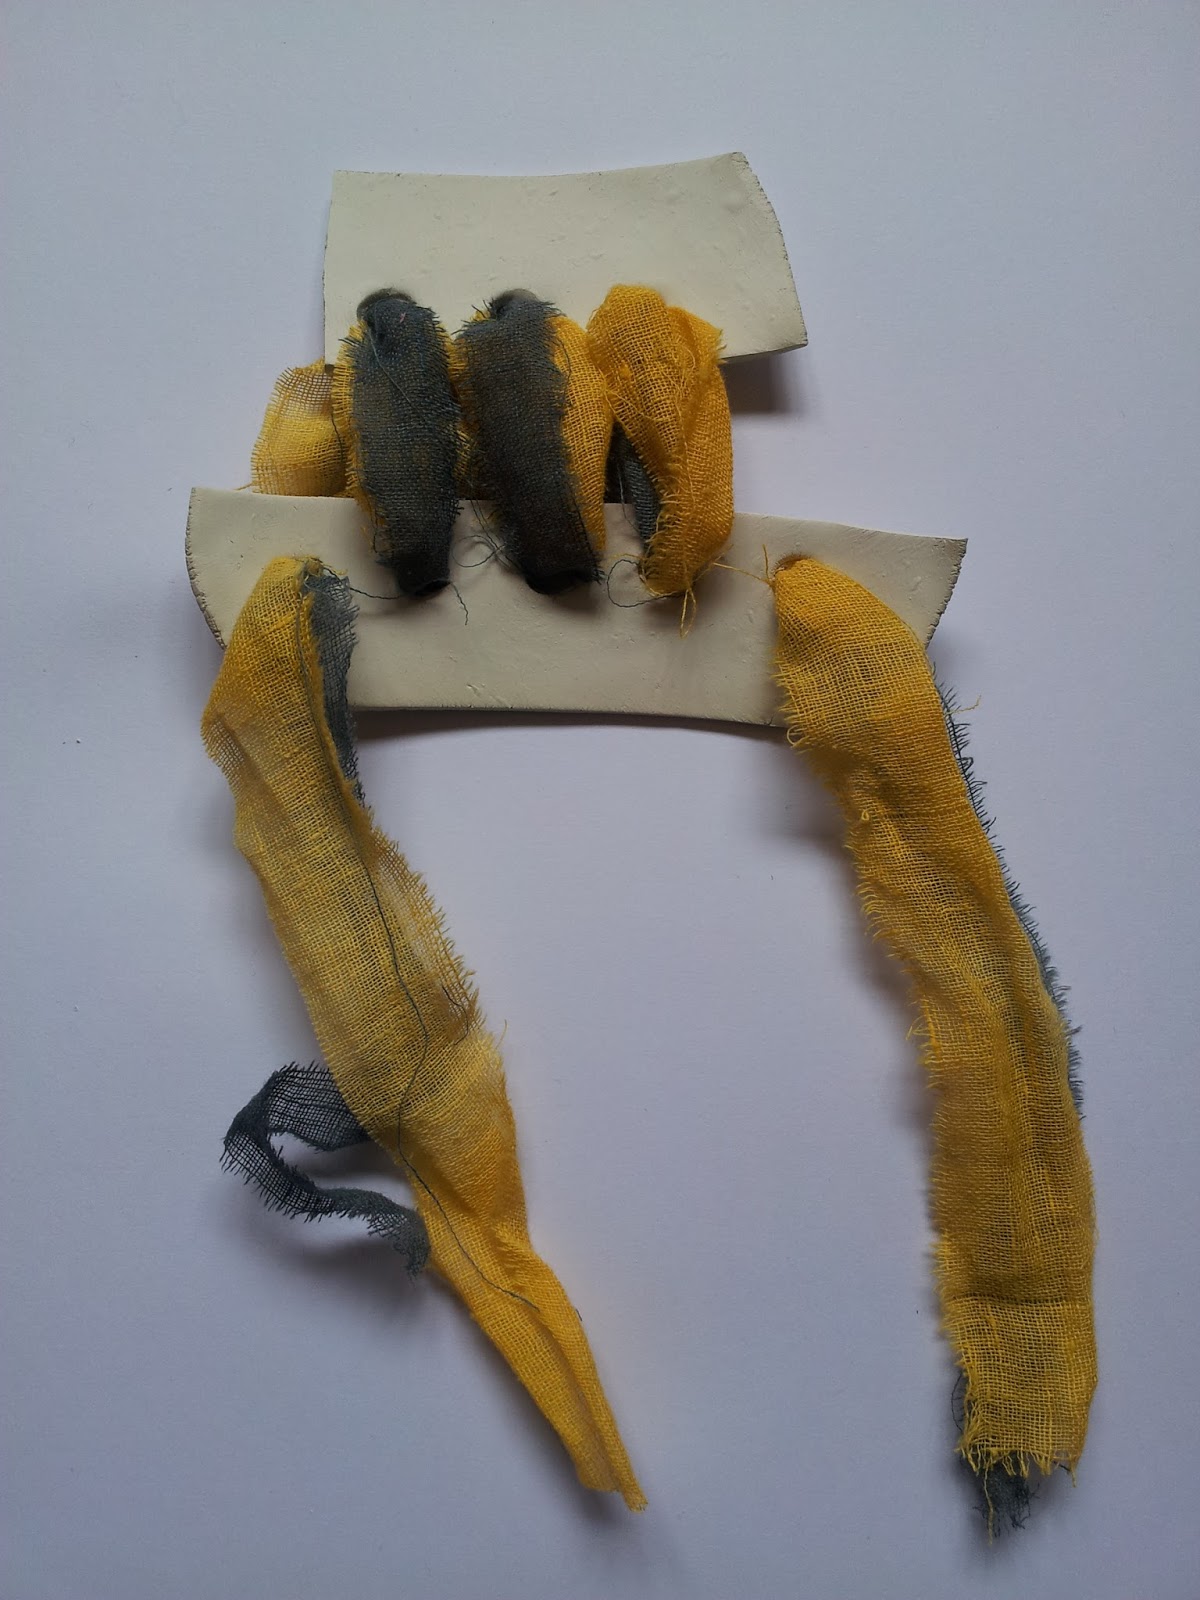
Air dry clay joined using strips of dyed scrim


Air dry clay joined with handmade silk paper using thread


Air dry clay joined by overlapping and sewn with thread


I really liked working with the air dry clay.  I decided to try joining pieces of clay with other materials.  Whilst the clay was still pliable I punched holes into the edges of each piece the size being dependent upon how thick the material/thread I was going to use. 

I particularly like the piece where the clay is overlapped and joined by stitching.  I like the look of the thread against the clay and the fact that the holes are larger than necessary for the thread.  It gives a pattern along the edge.

I think the sample where the clay is joined by the strips of scrim is also successful. It reminds me of the joining that is done on Samurai armour.  I like the contradiction that the clay is very fine but hard and the scrim is soft but thick.  I think this works well together.